So this past weekend my friend and I went to Book Con, a book convention (Now you know why I haven't posted any new DIY's.) I love books and I was hanging out with my friend so it was fun. But for the actual event I was highly disappointed it was not as epic or as big as I thought it would be. Maybe because in my mind I kept comparing it to Comic Con I expected it to be the same level of awesomeness. First of all the place was kinda of small and it was packed. There were long lines for everything and people were kinda of rude, they would cut you off and bump into you, Not very nice. But the exhibitors were very friendly. I got a free book sign by very nice author and got lots of free totes. There were a lot of authors I never heard about so that was a let down. The most annoying thing was that next to book con was another convention: Book Expo. OMG that looked way better than Book Con. It was bigger, less crowded and there to more exhibits. It looked so empty compared to Book Con. What sucked was that people with Book Con tickets couldn't enter the Book Expo but people with Book Expo tickets could go Book Con so not fair, I felt rip off. Overall this event was a fail, could have been better. But I had a great time with my friend. I hope next year they promote more the Book Expo because it looked so much more grand than Book Con. I would have went there instead of Book Con. So let me know if any of you guys went to Book Con? What did you think? and Did you ever go to any other convention? Tell me about your experience?
Wednesday, June 4, 2014
Monday, June 2, 2014
June Quote List
Hi everyone! This the June's quote list. Keep in touch let me know which quote you like and share your favorites with me.
I am brainstorming for a new DIY idea, hopefully soon I will have something new posted up.
- Strive not to be a success, but rather to be of value. –Albert Einstein
- Life isn’t about getting and having, it’s about giving and being. –Kevin Kruse
- I’ve learned that people will forget what you said, people will forget what you did, but people will never forget how you made them feel. –Maya Angelou
- Too many of us are not living our dreams because we are living our fears. –Les Brown
- The two most important days in your life are the day you are born and the day you find out why. –Mark Twain
- The only person you are destined to become is the person you decide to be. –Ralph Waldo Emerson
- All our dreams can come true, if we have the courage to pursue them. When I let go of what I am, I become what I might be. –Lao Tzu
Wednesday, May 14, 2014
DIY Fringe End Bracelet
Hi everyone! I know it has been a long time since I posted anything new. but I am finally back! This new DIY is inspired by a bracelet I saw at a store. It
looked fairly easy to make so I decide to make my own instead of buying it. That’s
a new thing I like to do, I go into a store and if I see a piece of jewelry I
like and if I think I can make it, I don’t buy it, I try to make my own. Now I shall share with you how to make your
own fringe end bracelet, so let’s get started:
Martials:

- Few beads (all the same color)
- Two different beads (could be different in color or size or material)
- Spacer’s beads
- One jump ring
- Embroidery Floss or thread (colors that are the same or match the color of the beads you are using)
- Beading/elastic thread
Step 1- Thread the beads in the elastic thread. First add
a bead and then a spacer bead, repeat the same process until you have a good
length of the bracelet beaded. Then cut the elastic thread but make sure to
leave enough string so you can add beads and tie it. Once you reach the very ends of the bracelets
add the different beads at each end of the bracelet.* Make sure your bracelet
is cut to your desired wrist length. (Average bracelet wrist length is 7 – 7 ½)


Step 2- Cut a few pieces of thread about 8’’ long or longer, enough pieces to have a nice bunch. This will be used to make a fringe.

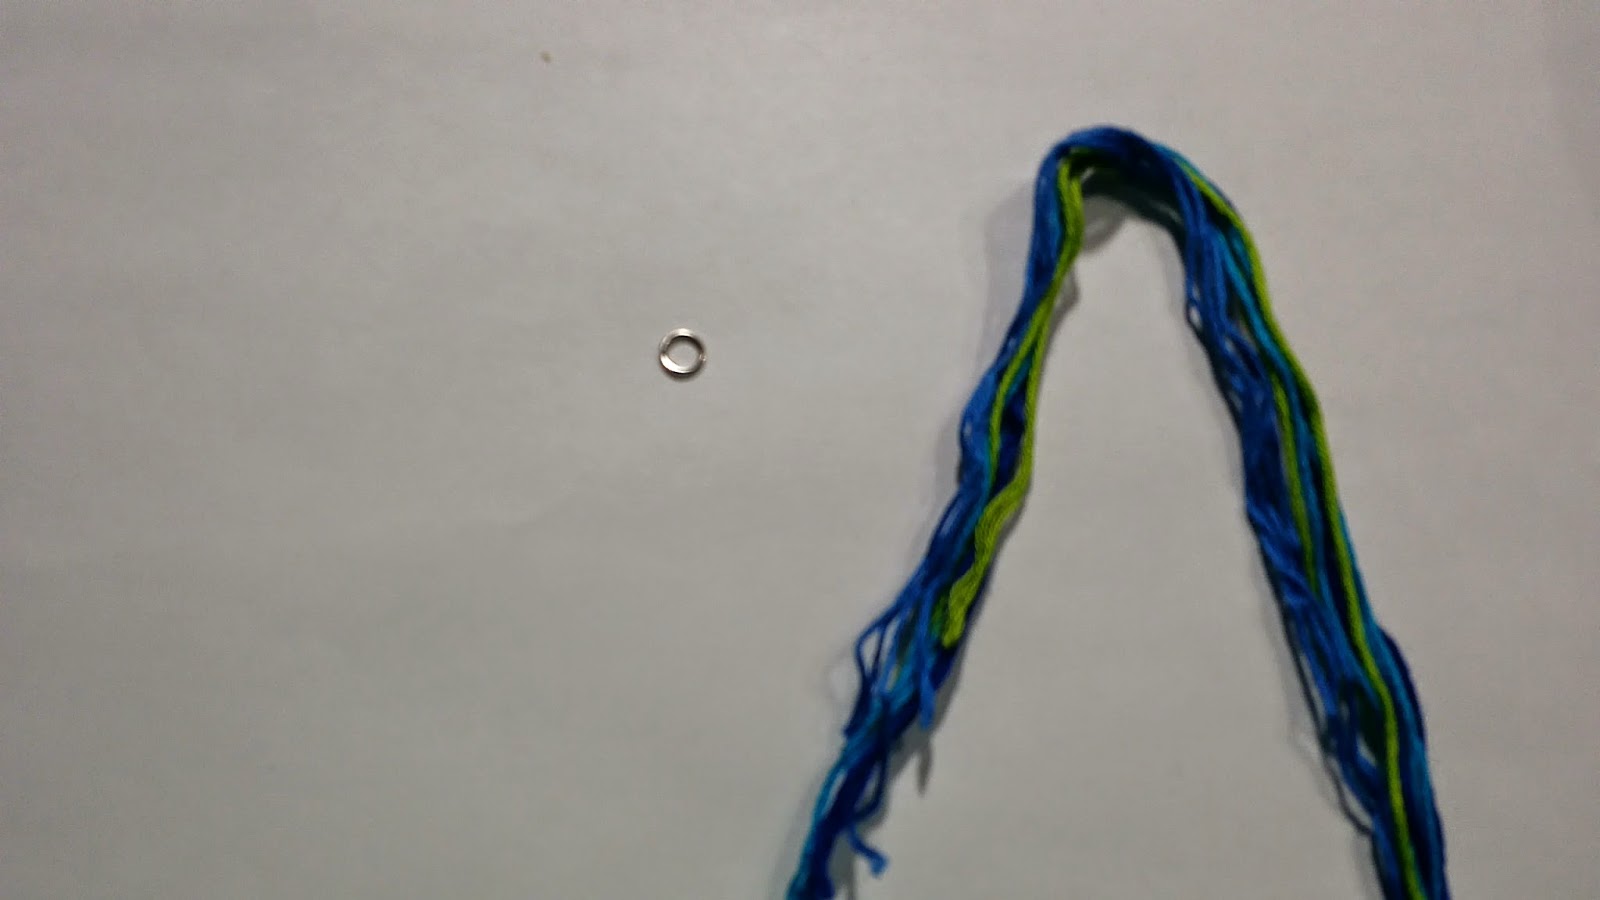
Step 3- Then use something to hold it down. Using another piece of
thread, tie it on top. Then wrap one side of the thread around the
bunch and tie it. Now just cut the ends to adjust the length you want it to be.
 |
| 1 |
 |
| 2 |
 |
| 3: This is how it should come out looking. |
Step 4- Add your fringe jump ring to one end of the
bracelet, then tie the bracelet.

There you have it, a super easy to make fringe bracelet. This is a great summer time bracelet.

Wednesday, April 30, 2014
April's Quote List
Hello everyone! Here is April's quote list. Sorry I haven't posted anything new yet, I am busy trying to come with new ideas. I will post a new DIY as soon as I can. Till then check out my older post!! :)
- The spirit is the true self-cicero
- They can because they think they can- Virgil
- To conquer fear is the beginning of wisdom.-bertrand Russell
- Everything has beauty but not everyone sees it- Confucius
- The challenge is not to win but to conquer the fear. It’s not the other people you have to beat, it’s yourself. -Anonymous
- Knowledge is power -proverb
- Love is of all passions the strongest, for it attacks simultaneously the head, the heart and the senses. -Lao Tzu
- Yesterday is but today's memory, and tomorrow is today's dream. -Khalil Gibran
- Knowing others is wisdom, knowing yourself is Enlightenment.
- Every cloud has a silver lining –john Milton
- Life is 10% what happens to me and 90% of how I react to it. –Charles Swindoll
Tuesday, April 22, 2014
Dream Catcher Necklace DIY
Hey everyone! For today's DIY, I got the idea to make a dream catcher necklace. It's a great piece of jewelry to have to give any outfit a bohemian feel.

- One ring (key hoop or any small round ring will do.)
- Yarn (ribbon, leather cord, twine, or whatever you have in hand.)
- Thread/floss
- Necklace thread (This can be any thread that looks nice and is strong.)
- Feathers
- Beads
- Crazy glue (I use this on everything!)
Step 1: Make a knot with the yarn anywhere on the ring, then wrap the yarn around the whole ring.


Step 2: Tie the thread near to where you made the knot and start to warp the thread as shown in the picture to make the web. You can also add beads to the web. To do this, add a couple of beads to the thread first and spread the beads as you wrap the thread to make your web.


Step 3: Cut off three or more pieces of thread long enough so you can add beads and feathers. Once you have your pieces of string, tie them to the dream catcher.Then add the beads to the strings. Place a feather into last bead at the end of the thread, as shown in the picture blow. Then wrap the excess thread around the feather and make a knot to secure it.


Step 4: Cut a piece of thread as long as desired (this will be used to make your necklace so be sure to leave a little extra.)

Step 5: Place the piece of thread you just cut to the middle of the dream catcher. Add a small bead to keep the thread in place then make a knot on the top of the bead. Next add a bead to the end of the thread and knot it. The bead at the end can be used to adjust the length of the necklace.


Now your boho chic. Check out my Dream Catcher DIY.
Wednesday, April 16, 2014
DIY Charm Necklace
For this DIY you will need a charm with two opening on each side.

Martials
Charm
Chain
Clasp
Jump rings
Pliers
Wire cutter
Ruler
Step 1- Using your pliers twist open the jump ring and
attach it to one hole on the charm and do the same for the other side. Now both
sides have a jump rings.

Step 2- Cut two pieces of chain your desired length. I
cut my two pieces 12 inches long. This will be used as the chain for your
necklace. ( I included a necklace length chart to help you figure out which length you would like to use. Remember that you will using two pieces of chain. So whatever length you deiced to use from the chart ,divided by two.)
.jpg)
Step 3- Using your pliers to twist open one jump ring and
attach it to one end of the chain then, add this piece to one of the jump ring
on the charm and twist back to close. Repeat the same process with the other
chain. (*Make sure the chains come out the same length*) Now you have the chain for the necklace.

Step 4- Now that you attach the chains to the charm. You
need to attach a jump ring at the end of each chain. On one end, using you pliers twist open the
jump ring and add a clasp to it and attach it to the chain.


Volia!! There you have it a simple to make necklace.
Friday, April 11, 2014
Bracelet Gallery Part 2
Hey everyone!! :) Here are some pictures of new bracelets I have made. They came out pretty good if I do say so myself. Check out my post on making a bead bracelet so you can make your own.


Sunday, April 6, 2014
2 Ways Chain Bracelet
Hey everyone! I got an all new bracelet tutorial, two different ways to make an elegant chain bracelet. Just follow these easy steps:


Step 2- Weave the ribbon through the openings of the chain. (Tip: Attach a pin to the end of the ribbon so you can easily weave the ribbon in and out of the chain.) Then just cut the ribbon your desired length, remember to leave enough left so you can tie it on.


Materials:
- Chain
- Ribbon
- Ruler
- Hot glue gun
- Pliers
- Clasp
- Jump rings
Bracelet 1: Ribbon Tie Bracelet
Step 1- Find the small gap in the chain and that is where you will use your pliers to twist it open so you can break off a piece of the chain about 4 inches long.
Step 2- Weave the ribbon through the openings of the chain. (Tip: Attach a pin to the end of the ribbon so you can easily weave the ribbon in and out of the chain.) Then just cut the ribbon your desired length, remember to leave enough left so you can tie it on.
Step 3- Use a bit of hot glue to secure the ends of the chain to the ribbon. (Tip: Heat the ends of the ribbon so the threads don't come unraveled. I took the picture before I heated the ends.) And there you have it, a simple and beautiful ribbon tie bracelet.
Bracelet 2: Ribbon Wrapped Bracelet
Step 1- Using your pliers break off a piece of a chain about 7 inches long, or your wrist size length. (Look at previous step 1 for more instructions.)
Step 2- Weave the ribbon through the openings of the chain.
Step 3- Once you finish weaving the ribbon in the chain cut off the ends. Then you can fold the excess ribbon inward and use a bit of hot glue to secure the ends of the ribbon to the chain.
Step 4- Using your pliers twist open a jump ring and add it to one corner of the bracelet then close that jump ring by twisting it back in place. Using the same process add another jump ring with a clasp at the other side. Now you have a ribbon wrapped bracelet.
Wednesday, April 2, 2014
Elastic Charm Bracelet
Hey everyone! I got some colorful elastic cord at my local 99 cents store. And I decided, I could either turn into a hair tie or bracelet. So I decided to make a bracelet which I think could double as a hair tie. This is super easy and fun to make.

Step 1- Cut a piece of Elastic cord about 9 inches or your wrist size but make sure to add 2 or 3 inches more so you make a knot at the end. (Tip: Use a lighter to heat the ends of cord so the threads don't come on unraveled.)


Step 4- Using your pliers open one of the jump rings and add your charm. Then close the jump ring. Repeat this step to add as many charms as you like to your bracelet.

Materials:
- Thick Elastic cord
- Jump rings (How to use)
- Pliers
- Charms
Step 1- Cut a piece of Elastic cord about 9 inches or your wrist size but make sure to add 2 or 3 inches more so you make a knot at the end. (Tip: Use a lighter to heat the ends of cord so the threads don't come on unraveled.)
Step 2- Add as many jump rings to the elastic cord as you want, but make sure you leave enough room to make a knot at the end. You can just slip the jump rings on the cord.
Step 3- Make a knot once you finish adding jump rings and make sure it is not too tight on your wrist.
Monday, March 31, 2014
Quotes!!!
Hello hello everyone! I love quotes, so included,quotes of the day side bar note on my blog. Here is a list of the past month's quotes of day. As you can tell the list is pretty short, quote of the day is more like the weekly quote. I will try to update the quotes more frequently this month and at the end of each month I will make a list so you can see them all. I have a few ideas in mind on how to incorporate these quotes in a DIY, so that project will be coming up soon. And on a side note I updated some previous post just add some helpful links, so check that out.
Pasted Quotes:
"Your hopes have become my burden. I will find my own
liberation." –Unknown
"Expect the
unexpected."
"Every artist was
first an amateur"- anonymous
"As human beings,
our greatness lies not so much in being able to remake the world – that is the
myth of the atomic age – as in being able to remake ourselves." ― Mahatma Gandhi
"A journey of a
thousand miles must begin with a single step." –Lao Tuzr
"Life is either a
daring adventure or nothing to keep our faces toward change and behave like
free sprities in the presence of fate is strength undefeatable." –Helen Keller
"Be not afarid of
greatness "-William Shakespeare
"Everybody is a genius. But if you judge a fish by its
ability to climb a tree, it will live its whole life believing that it is
stupid." ― Albert Einstein
"The heart has its reasons, which reason knows nothing of "–
Blaise Pascal
"everyone is entitled to their own sorrow, for the
heart has no metrics or form of measure. and all of it... irreplaceable.” - unknown
Subscribe to:
Posts (Atom)